Tamales
Being a great fan of Mexican food, tamales are one of my favorites. I ate tamales from the can or from shrink-wrapped plastic wrappers for years. Not knowing any better, I thought they tasted marvelous in such a form, especially if cheese or chili was spooned over the top. I remember peeling the wrappers off individual tamales and thinking they were similar to wet paper, which in reality they probably were. Now I know better. There is no need to mask the taste of authentic tamales with cheese, chili or other condiments – they stand quite well on their own.
I was privileged to be a part of a family session of prepping and assembling bona fide homemade tamales in December 2001. The process is quite lengthy, but well worth the end result.
I would like to thank the late Wilbert Alviso (2011) and his late mother Elva (2014) for allowing me to participate in the making of authentic Mexican tamales. It was a special experience for me, and one I've never forgotten. I took copious notes the entire time, although my major contribution to the afternoon was spreading Masa on the corn husks with Wilbert. Nonetheless, it was an enjoyable culinary venture.
"Tamales from a Home Kitchen" ©Shenanchie O'Toole. Reprinted with permission.
The Corn Husks
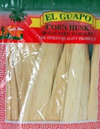 Corn husks for making tamales can typically
be found at Mexican specialty stores, or in the Hispanic foods
section of the local grocery store. The husks come from corn on
the cob, and need to be cleaned the same way. Most
store-purchased corn husks are dried and bleached. The corn
"hair" needs to be cleaned out of the husks once you open the
package. There are dozens per package, so only take out as many
as you need. (Note: Leftover corn husks will store
quite well if kept dried). The husks are layered together,
so separate them carefully. You will find corn "hair" in the
husks (sometimes at random), which needs to be removed. Soak
corn husks in a clean sink full of warm water for about ten to
fifteen minutes. Soaking softens the husks, making them more
pliable and easier to manage. After soaking, place husks in a
stainless steel bowl.
Corn husks for making tamales can typically
be found at Mexican specialty stores, or in the Hispanic foods
section of the local grocery store. The husks come from corn on
the cob, and need to be cleaned the same way. Most
store-purchased corn husks are dried and bleached. The corn
"hair" needs to be cleaned out of the husks once you open the
package. There are dozens per package, so only take out as many
as you need. (Note: Leftover corn husks will store
quite well if kept dried). The husks are layered together,
so separate them carefully. You will find corn "hair" in the
husks (sometimes at random), which needs to be removed. Soak
corn husks in a clean sink full of warm water for about ten to
fifteen minutes. Soaking softens the husks, making them more
pliable and easier to manage. After soaking, place husks in a
stainless steel bowl.
The Filling
Most tamales have meat fillings, but they can also be prepared using cheese, refried beans or chilies. During our session, Elva prepared pork tamales and filled leftover husks with refried beans and Monterey Jack cheese, and then with green chilies and cheese. Beef, chicken or leftover turkey combinations also make hearty fillings.
- 4 LBS pork shoulder roast
- Cumin to taste
- Garlic cloves, peeled & minced (amount to taste)
- Salt & black pepper to taste
Elva seasoned a pork shoulder roast with cumin, garlic, salt and black pepper. She simmered it slowly in a large pot of water until it was fully cooked, and then let it stand for a few hours. After the meat was sufficiently cool to the touch, she shredded the meat by hand into 2" and 3" strips. She returned the shredded meat to a large frying pan, and then added a bit of the juice from the frying pan as additional flavoring. She added more cumin, salt, black pepper and garlic and stirred the mixture well. She kept the filling warm until we were ready to add it to the Masa-layered corn husks.
The Masa
Contrary to popular belief, homemade tamales can be made from packaged Masa. Elva used "Maseca" instant corn Masa mix from Azteca Milling, although Quaker now has their own brand as well. Ingredients included in instant Masa mix are commonly corn, water and lime.
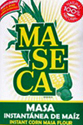 The complete ingredients for Masa dough are as follows:
- 2 C Maseca
- 2 C lukewarm water or broth
- 1 tsp. baking powder
- 1/2 tsp. salt (or to taste)
- 2/3 C lard (or shortening)
Elva told me to use lard in the mixture rather than shortening, and to increase the amount to two cups. In a large bowl, combine the Maseca with baking powder and salt. Work the water or broth in with your hands to make a soft, moist dough. In another bowl, beat the lard (or shortening) until fluffy. Add the Masa mixture; beat until the dough has a spongy texture. Knead dough for a few minutes. I noticed Elva spread the dough in a large aluminum roasting pan to knead. It should have an elastic texture at this point, and not sticky like regular flour-dough.
Spreading the Masa
Wilbert told me he and his mother used spoons for many years when spreading Masa on the corn husks. One day he decided the method was too difficult and time-consuming, so he used a flat spatula to spread the Masa instead. Using a spatula speeds-up the process of spreading Masa. Wilbert used a slotted variety, while I brought along a solid spatula. When Elva set the roasting pan filled with Masa on the kitchen table, Wilbert and I began to work.
As I had never spread Masa before, Wilbert showed me how to do it on the first few tries. At this point, the Masa had a wonderful, elastic texture which was not sticky like regular flour-dough. The corn husks had been removed from the warm water, and set into a stainless steel bowl on the kitchen table. Taking the spatula flip-side up, we scraped out chunks of Masa and spread them carefully onto the corn husks. Since the husks are triangular in shape, the "pointed" end needs to be on top as the process begins. If there are any loose ends on the edges of the husks, strip them away and set them aside. Once they dry, Elva uses the strips to tie various things together. If there is a tear in the husk, use a smaller piece of husk to patch the area. Spread Masa over the tear, and then simply take the smaller piece and fit it over the tear, leaving the end a bit farther out on the bottom. Once the Masa is layered, any repaired tears should hold in place.
Scooping Masa with the spatula, proceed to spread it onto the husk about two inches from the top. Spread evenly over the husk, including the edges. Wilbert liked thick Masa, but suggested a normal Masa spread is about 1/8" in thickness. Once one husk is finished, set it aside and begin another. As each one is complete, lay the husks on top of each another. They should not stick together. Repeat process until all of the Masa is used. (You will probably run out of Masa before you run out of husks). Once you get the rhythm of spreading the Masa on the corn husk, it goes smoothly and quickly.
Filling & Folding
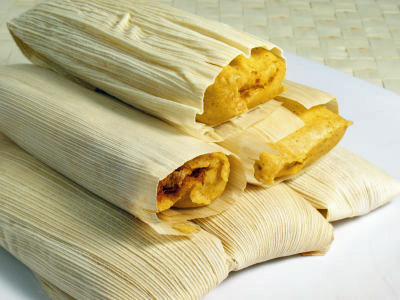
Once Masa has been spread on the corn husks, they are ready to be filled. Using a large spoon, scoop pork filling mixture down the center of the husk. Fill evenly, but make sure to keep it down the middle. Then roll the husk from one side (as if rolling a tortilla), tucking carefully but tightly as you go. Once you have rolled the husk completely, fold the slender end over (the tip of the triangle). Repeat with all the husks and the remaining filling.
Cooking the Tamales
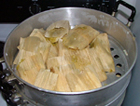 After the husks are filled and rolled, they
need to be steamed. Professional home steamers work well, but
might not hold a lot of husks at one time. Wilbert and Elva used
a large pot, filled about halfway with water. Wilbert purchased
a collapsible steamer basket to set down in the water, but it
was not submerged. Arrange filled husks with the folded-side up,
and fit them snugly so they stand upright together. Once the
basket is filled, cover and start boiling. Depending on the
thickness of the Masa, the tamales can take anywhere from one
hour to ninety minutes to cook. To test doneness, take one of
the tamales from the pot and try removing the corn husk. If the
husk removes easily, the tamales are done. If the Masa is still
sticking to the husks, they need to be cooked a bit longer.
After the husks are filled and rolled, they
need to be steamed. Professional home steamers work well, but
might not hold a lot of husks at one time. Wilbert and Elva used
a large pot, filled about halfway with water. Wilbert purchased
a collapsible steamer basket to set down in the water, but it
was not submerged. Arrange filled husks with the folded-side up,
and fit them snugly so they stand upright together. Once the
basket is filled, cover and start boiling. Depending on the
thickness of the Masa, the tamales can take anywhere from one
hour to ninety minutes to cook. To test doneness, take one of
the tamales from the pot and try removing the corn husk. If the
husk removes easily, the tamales are done. If the Masa is still
sticking to the husks, they need to be cooked a bit longer.
Freezing: Tamales freeze well. Make sure they are properly wrapped in plastic wrap or inside a plastic freezer bag.
*Tamales and tamales in steamer images (C) Pixeltoo (2005). Images released into the public domain by author and copyright holder; from Wikimedia Commons.
![]()